Potions are useful Minecraft items which are made by combining ingredients according to recipes at a brewing stand. This guide includes every potion recipe in the game, current as of Minecraft 26.2.
Potions provide benefits like increasing movement speed and healing, similar to buffs from beacons. Another use is to harm enemies in combat, for example by throwing a poison potion at a zombie.
Brewing is very different than crafting other items or enchanting your armor. To get started with brewing in Minecraft, you will first need the following essential items: a brewing stand, water bottles, nether wart, and blaze rods.
Blaze rods and nether wart are found in the nether, so you will need to build a nether portal and travel to the nether to gather them. To craft a brewing stand, you will need one blaze rod. Both nether wart and blaze rods can be found in nether fortresses.
Note that once you obtain nether wart, you are able to grow it in the main Minecraft world using soul sand instead of tilled soil. It is a good idea to build an automatic farm to keep a steady supply of nether wart.
How to Use the Brewing Stand
The brewing stand has a total of five crafting slots. Below we have a photo of a Minecraft brewing stand with each slot labelled with a description:
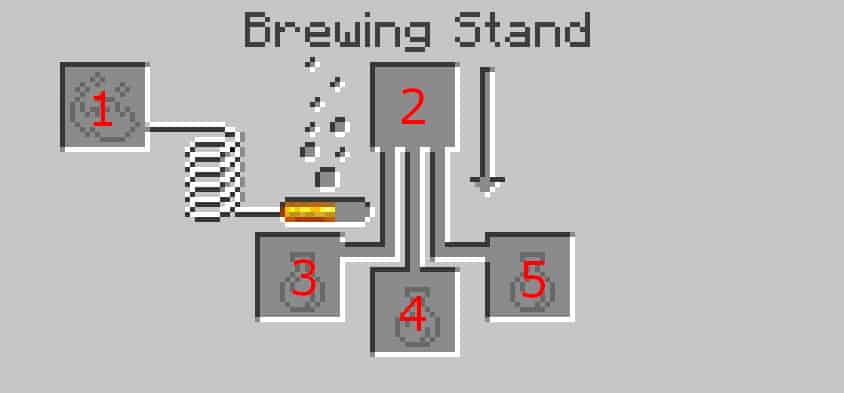
- 1. Fuel Slot: You must add blaze powder to this slot for the brewing process to proceed. This is similar to using coal for fueling a furnace.
- 2. Primary Ingredient Slot: This is where primary ingredients go, which is essentially anything that is not a bottle. Ingredients like sugar or spider eyes will go in this slot only.
- 3, 4, & 5: Bottle Slots: Any ingredient in a bottle needs to go in the bottom 3 slots (does not matter which slot is used). Most commonly you will put water bottles and awkward potions into this slot.
Typically, the brewing stand is best placed somewhere near your storage area. This provides easy access to brewing ingredients.
How to Make Awkward Potions
The “Awkward Potion” is the precursor for nearly every potion in Minecraft. To craft an awkward potion, use a brewing stand to combine one nether wart (in the primary ingredient slot) and up to three water bottles. It is possible to craft up to three awkward potions with just one nether wart.
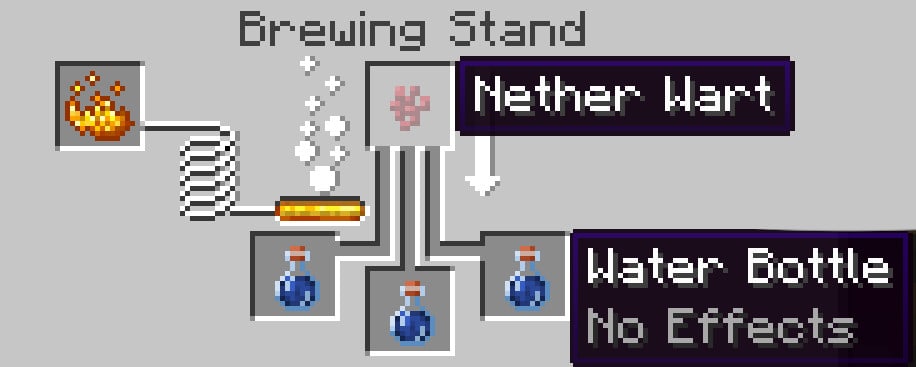
The awkward potion by itself is useless and has no effect. It must be combined with additional ingredients to make functional potions.
All Minecraft Potion Recipes (2026)
We have created a chart of all Minecraft potion recipes in the game. To use this chart, simply find the potion you want to make and combine the necessary ingredients using a brewing stand.
Tip: The primary ingredient will always go in the top slot of the brewing stand and any ingredients in a bottle will go in the bottom slots.
Defensive & Beneficial Minecraft Potions
| Potion | Ingredients | Effect |
|---|---|---|
| Potion of Swiftness | Sugar + Awkward Potion | Increases speed by 20% (40% if glowstone dust added) |
| Potion of Strength | Blaze Powder + Awkward Potion | Increases melee attack damage |
| Potion of Night Vision | Golden Carrot + Awkward Potion | Increases brightness in dark areas (nighttime, caves, underwater, etc) |
| Potion of Invisibility | Fermented Spider Eye + Potion of Night Vision | Makes player invisible to other players and enemy mobs |
| Potion of Healing | Glistering Melon Slice + Awkward Potion | Instantly restores health points |
| Potion of Regeneration | Ghast Tear + Awkward Potion | Restores health points over time |
| Potion of Fire Resistance | Magma Cream + Awkward Potion | Makes player temporarily immune to fire and lava damage |
| Potion of Slow Falling | Phantom Membrane + Awkward Potion | Temporarily reduces fall speed and damage |
| Potion of Water Breathing | Pufferfish + Awkward Potion | Allows player to temporarily breathe underwater |
| Potion of Leaping | Rabbit’s Foot + Awkward Potion | Temporarily increases jump height |
| Potion of the Turtle Master | Turtle Shell + Awkward Potion | Reduces incoming damage, but also slows down movement speed |
Offensive Minecraft Potions
Notice a pattern in this table: the fermented spider eye “corrupts” a potion into its opposite. Night Vision becomes Invisibility, Healing becomes Harming, and Swiftness becomes Slowness.
| Potion | Ingredients | Effect |
|---|---|---|
| Potion of Weakness | Fermented Spider Eye + Plain Water Bottle | Reduces attack damage |
| Potion of Poison | Spider Eye + Awkward Potion | Does damage over time |
| Potion of Harming | Fermented Spider Eye + Potion of Healing (or Potion of Poison) | Does instant damage |
| Potion of Slowness | Fermented Spider Eye + Potion of Swiftness (or Potion of Leaping) | Reduces movement speed |
Trial Chamber Potions (Newest Potions)
Four newer potions arrived with the trial chambers, and they work differently from the classics. Instead of a normal buff, their effects trigger when the affected mob or player takes damage or dies, which makes them great for traps, farms, and pranking your friends.
| Potion | Ingredients | Effect |
|---|---|---|
| Potion of Wind Charging | Breeze Rod + Awkward Potion | Affected mobs burst into a gust of wind when they die |
| Potion of Weaving | Cobweb + Awkward Potion | Affected mobs leave cobwebs behind when they die, and can walk through cobwebs freely |
| Potion of Oozing | Slime Block + Awkward Potion | Affected mobs spawn slimes when they die |
| Potion of Infestation | Stone + Awkward Potion | Damage taken has a chance to spawn silverfish |
Note that these four potions cannot be upgraded with redstone or glowstone dust like the classic potions can.
Upgrading Minecraft Potions
Some potions are not very useful in Minecraft unless you brew them even further to upgrade them. For example, who would want to drink a potion of poison? Luckily, you can upgrade potions to splash potions (throwable potions), extended duration, and increased effect.
Splash & Lingering
Brewing an already-made Minecraft potion with gunpowder will convert it into a splash potion. When right clicking a splash potion, you will now throw it instead of drinking it. Any player or monster near where the bottle lands will receive the benefits or harms of the potion. This upgrade can be used to make potions which poison enemies or heal other players.
A splash potion can be further upgraded to a “lingering potion” by brewing a splash potion with dragon’s breath. A lingering potion is the same as a splash potion, but the splash effect lingers around for players or enemies to walk in.
Extended Duration
Brewing with redstone dust will increase the duration of the potion. For example, an effect may last 8 minutes instead of 3 minutes.
Increased Effect
Brewing with glowstone dust will increase the potency/effect of the potion. For example, a healing potion with glowstone added would heal more hearts.
Not all Minecraft potions can be upgraded. For example, you are not able to add redstone dust to an instant healing potion as there is no duration to extend, however you could add glowstone dust to increase the overall healing effect.
Frequently Asked Questions
How do you make an awkward potion?
Combine one nether wart with up to three water bottles in a brewing stand, with blaze powder in the fuel slot. The awkward potion has no effect on its own, but it is the base for almost every potion in the game.
What is the difference between redstone and glowstone in brewing?
Redstone dust makes a potion last longer, while glowstone dust makes the effect stronger. You cannot apply both to the same potion, so pick duration or power.
How do you make a splash potion?
Brew any finished potion with gunpowder. The bottle becomes throwable, and everyone near where it lands gets the effect. Add dragon’s breath afterward to turn it into a lingering potion that leaves an effect cloud.
What are the newest potions in Minecraft?
The four newest potions are Wind Charging (breeze rod), Weaving (cobweb), Oozing (slime block), and Infestation (stone), all brewed from awkward potions. Their effects trigger when the affected mob dies, which makes them useful for traps and mob farms.
That concludes our Minecraft potion brewing guide! Did we miss your favorite recipe? Leave a comment below!